Session details
Objectives
- To become aware of and learn some “best practices” (or “good enough practices”) for project organization.
- To use RStudio to create and manage projects with a consistent structure and a consistent way.
- To get a basic orientation to RStudio and to what R is.
At the end of this session you will be able:
- To apply the best practices in using R for data analysis.
- To create a new RStudio project with a consistent folder structure.
- To use a style guide for formatting your code.
- To organise folders in a consistent, structured, and systematic way.
Summary
- Use R Projects in RStudio
- Use a standard folder and file structure
- Use a consistent style guide for code and files
- Use version control
- Keep R scripts simple, focused, short
- Use the
here()function from the here package - Save data in the
data/folder as csv - Don’t repeat yourself in code (or try not to) by using functions
Project management
Best practices overview
The ability to read, understand, modify, and write simple pieces of code is an essential skill for modern data analysis tasks and projects. Here we introduce you to some of the best practices one should have while writing their code. Many of the best practices were taken from the “best practices” articles listed in the “Resources” section below.
- Organise all R scripts and files in the same directory (use a common and consistent folder and file structure).
- Use version control.
- Make raw data “read-only” (don’t edit it directly) and use code to show what was done.
- Write and describe code for people to read (be descriptive and use a style guide).
- Think of code as part of your manuscript/thesis/report: Write for an audience or other reader.
- Don’t repeat yourself (use and create functions1).
- Whenever possible, use code to create output (figures, tables) rather than manualling creating or editing them.
Managing your projects in a reproducible fashion doesn’t just make your science reproducible, it also makes your life easier! RStudio is here to help us with that by using R Projects. RStudio projects make it straightforward to divide your work into multiple contexts, each with their own working directory, workspace, history, and source documents.
It is strongly recommended that you store all the necessary files that will be used in your code in the same parent directory2. You can then use relative file paths to access them (we’ll talk about file paths below). This makes the directory and R Project a “product” or “bundle/package”. Like a tiny machine, that needs to have all its parts in the same place.
Creating your first project
There are many ways one could organise a project folder. We’ll set up a project directory folder using prodigenr:
# prodigenr::setup_project("ProjectName")
prodigenr::setup_project("learning-r")
When we use the :: colon here, we are telling R “from the prodigenr package use
the setup_project function”. This function will then create the following
folders and files:
learning-r
├── R
│   ├── README.md
│   ├── fetch_data.R
│   └── setup.R
├── data
│   └── README.md
├── doc
│   └── README.md
├── .Rbuildignore
├── .gitignore
├── DESCRIPTION
├── learning-r.Rproj
└── README.md
This forces a specific, and consistent, folder structure to all your work. Think of this like the “introduction”, “methods”, “results”, and “discussion” sections of your paper. Each project is then like a single manuscript or report, that contains everything relevant to that specific project. There is a lot of power in something as simple as a consistent structure. Projects are used to make life easier. Once a project is opened within RStudio the following actions are taken:
- A new R session (process) is started.
- The current working directory is set to the project directory.
- RStudio project options are loaded.
The README in each folder explains a bit about what should be placed there. But briefly:
- Documents like manuscripts, abstracts, and exploration type documents should
be put in the
doc/directory (including R Markdown files which we will cover later). - Data, raw data, and metadata should be in either the
data/directory or indata-raw/for the raw data. - All R files and code should be in the
R/directory. - Name all new files to reflect their content or function. Follow the tidyverse style guide for file naming.
For the course, we’ll delete all files except for the R/, data/, and doc/
folders as well as the learning-r.Rproj and .gitignore file. For any
project, it is highly recommended to use version control. We’ll be
covering version control in more detail later in
the course.
Exercise: Better file naming
Time: 4 min
Let’s take some time to think about file naming. Look at the list of file names below. Which file names are good names and which shouldn’t you use? We’ll discuss after why some are good names and others are not.
fit models.R
fit-models.R
foo.r
stuff.r
get_data.R
Manuscript version 10.docx
manuscript.docx
new version of analysis.R
trying.something.here.R
plotting-regression.R
utility_functions.R
code.R
Next steps after creating the project
Now that we’ve created a project and associated folders, let’s add some more options to the project. One option to set is to ensure that every R session you start is a “blank slate”, by typing and running in the Console:
usethis::use_blank_slate()
Now, let’s add some R scripts that we will use in later sessions of the course.
usethis::use_r("project-session")
usethis::use_r("wrangling-session")
usethis::use_r("version-control-session")
usethis::use_r("visualization-session")
Writing code
RStudio layout and usage
Open up the R/project-session.R file and type out the code in that file for
the code-along parts. For an overview of the RStudio layout, see their
cheatsheet on using it.
The items to know right now are the “Console”, “Files”/“Help”, and “Source”
tabs.
Code is written in the “Source” tab, where it saves the code and text as a file.
You send code to the console from the opened file by typing Ctrl-Enter (or
clicking the “Run”). When you type code, you can use “Tab-completion” to finish
a code. By using the tab key as you type out a command, RStudio will list out
possible options of commands you are trying to type. If you need help with a
command, type in the “Console” ?codename. We’ll use this more later. In the
“Source” tab (where R scripts and R Markdown files are shown), there is a
“Document Outline” button (top right beside the “Run” button) that shows you the
headers or “Sections” (more on that later).
Basics of using R
In R, everything is an object and every action is a function. A function is an
object, but an object isn’t always a function. To create an object, also called
a variable, we use the <- assignment operator:
weight_kilos <- 100
weight_kilos
#> [1] 100
The new object now stores the value we assigned it. We can read it like:
- “weight kilos now contains the number 100”, or
- “put 100 into the object weight kilos”
You can name an object in R almost anything you want, but it’s best to stick to
a style guide. For instance, use snake_case to name things.
There are also several main “classes” (or types) of objects in R: lists, vectors, matrices, and data.frames. For now, the only two we will cover are vectors and data.frames. Vectors are a string of values put together while data.frames are multiple vectors put together as columns.
# These are vectors:
c("a", "b", "c")
c(TRUE, FALSE, FALSE)
c(1, 5, 6)

# This is a dataframe:
head(iris)
Notice how we use the # to write comments or notes. Whatever we write after
the “hash” (#) means that R will ignore it and not run it. The function c()
combines values together and head() prints the first 6 rows. To get more
information from data.frames, use:
# Column names
colnames(iris)
#> [1] "Sepal.Length" "Sepal.Width"  "Petal.Length" "Petal.Width"
#> [5] "Species"
# Structure
str(iris)
#> 'data.frame':	150 obs. of  5 variables:
#>  $ Sepal.Length: num  5.1 4.9 4.7 4.6 5 5.4 4.6 5 4.4 4.9 ...
#>  $ Sepal.Width : num  3.5 3 3.2 3.1 3.6 3.9 3.4 3.4 2.9 3.1 ...
#>  $ Petal.Length: num  1.4 1.4 1.3 1.5 1.4 1.7 1.4 1.5 1.4 1.5 ...
#>  $ Petal.Width : num  0.2 0.2 0.2 0.2 0.2 0.4 0.3 0.2 0.2 0.1 ...
#>  $ Species     : Factor w/ 3 levels "setosa","versicolor",..: 1 1 1 1 1 1 1 1 1 1 ...
# Summary statistics
summary(iris)
#>   Sepal.Length    Sepal.Width     Petal.Length    Petal.Width
#>  Min.   :4.300   Min.   :2.000   Min.   :1.000   Min.   :0.100
#>  1st Qu.:5.100   1st Qu.:2.800   1st Qu.:1.600   1st Qu.:0.300
#>  Median :5.800   Median :3.000   Median :4.350   Median :1.300
#>  Mean   :5.843   Mean   :3.057   Mean   :3.758   Mean   :1.199
#>  3rd Qu.:6.400   3rd Qu.:3.300   3rd Qu.:5.100   3rd Qu.:1.800
#>  Max.   :7.900   Max.   :4.400   Max.   :6.900   Max.   :2.500
#>        Species
#>  setosa    :50
#>  versicolor:50
#>  virginica :50
#>
#>
#>
Some tips to use when working in R:
- Think of writing code as if writing in a language
- Imagine other people will read your code
- Keep it clear, simple, and readable
- Stick to a style guide
- Use full and descriptive words when typing and creating objects
- Use white space to separate concepts (empty lines between, spaces, and/or tabs)
- Use Sections (
"Code->Insert Section"orCtrl-Shift-R) to separate content in scripts.
Even though R doesn’t care about naming, spacing, and indenting, it really matters how your code looks. Coding is just like writing. Even though you may go through a brainstorming note-taking stage of writing, you eventually need to write correctly so others can understand, and read, what you are trying to say. In coding, brainstorming is fine, but eventually you need to code in a readable way. That’s why using a style guide is really important.
Exercise: Make code more readable
Time: 10 min
Using the style guide in the link, try to make these code more readable. Copy
and paste these text into the R/project-session.R file. The code below is in
some way either wrong or incorrectly written. Edit the code so it follows the
correct style and so it’s easier to understand and read. You don’t need to
understand what the code does, just follow the guide.
# Object names
DayOne
dayone
T <- FALSE
c <- 9
mean <- function(x) sum(x)

# Spacing
x[,1]
x[ ,1]
x[ , 1]
mean (x, na.rm = TRUE)
mean( x, na.rm = TRUE )
function (x) {}
function(x){}
height<-feet*12+inches
mean(x, na.rm=10)
sqrt(x ^ 2 + y ^ 2)
df $ z
x <- 1 : 10

# Indenting
if (y < 0 && debug)
message("Y is negative")
The old code is in comments and the better code is below it.Click for a possible solution
# Object names

# Should be camel case
# DayOne
day_one
# dayone
day_one

# Should not over write existing function names
# T = TRUE, so don't name anything T
# T <- FALSE
false <- FALSE
# c is a function name already. Plus c is not descriptive
# c <- 9
number_value <- 9
# mean is a function, plus does not describe the function which is sum
# mean <- function(x) sum(x)
sum_vector <- function(x) sum(x)

# Spacing
# Commas should be in correct place
# x[,1]
# x[ ,1]
# x[ , 1]
x[, 1]
# Spaces should be in correct place
# mean (x, na.rm = TRUE)
# mean( x, na.rm = TRUE )
mean(x, na.rm = TRUE)
# function (x) {}
# function(x){}
function(x) {}
# height<-feet*12+inches
height <- feet * 12 + inches
# mean(x, na.rm=10)
mean(x, na.rm = 10)
# sqrt(x ^ 2 + y ^ 2)
sqrt(x^2 + y^2)
# df $ z
df$z
# x <- 1 : 10
x <- 1:10

# Indenting should be done after if, for, else functions
# if (y < 0 && debug)
# message("Y is negative")
if (y < 0 && debug)
    message("Y is negative")
Automatic styling with styler
You may have organised the exercise by hand, however it is possible to do it automatically. The tidyverse style guide has been implemented into the styler package to automate the process of following the guide by re-styling selected code. The styler snippets can be found in the Addins function on the top of your R document after you have installed it.
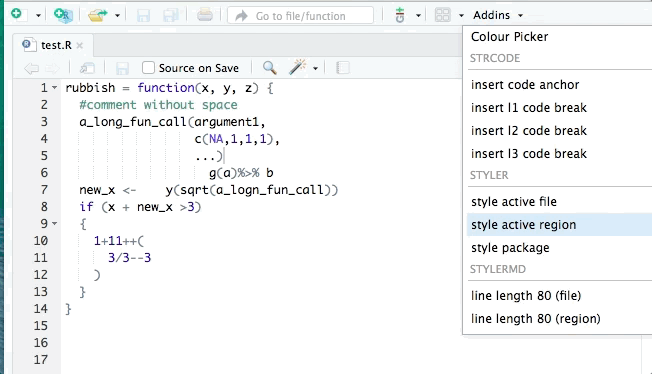
RStudio also has its own automatic styling ability, through the menu item "Code ->
Reformat Code" (or Ctrl-Shift-A). Try both methods of styling on the exercise
code above. There are slight differences in how each method works and they both
aren’t always perfect.
DRY and describing your code
DRY or “don’t repeat yourself” is another way of saying, “make your own functions”! That way you don’t need to copy and paste code you’ve used multiple times. Using functions also can make your code more readable and descriptive, since a function is a bundle of code that does a specific task… and usually the function name should describe what you are doing. We’ll be covering functions more in the Efficient Coding section of the course, but we’ll talk about it briefly here.
What does a “function” mean? A function is, as mentioned, a bundled sequence of code that does a specific thing. Imagine it as a machine, like a microwave or oven. Each has a bunch of parts that work together to do something (e.g. cook food). Same with functions. And like machines, you can look at the contents of functions, like so:
# Inside standard deviation function
sd
#> function (x, na.rm = FALSE)
#> sqrt(var(if (is.vector(x) || is.factor(x)) x else as.double(x),
#>     na.rm = na.rm))
#> <bytecode: 0x55780c4ba810>
#> <environment: namespace:stats>
It is very important for your future self, and for any person that will be
reading/using your code to be able to understand what the code does and what
it will create (or output). So it’s crucial to describe what the code does
through code comments, documentation, and descriptive naming of the function and
other objects. For instance, if your function name is decriptive, then you don’t
need to spend much time describing what the code does and remember how to use
it. Also, use code comment (anything after a #) to provide more detailed
explanations of your code if the code is complicated or long (these of course are
a bit subjective).
Example:
# The following function outputs the sum of two numeric objects (a and b).
# usage: summing(a = 2, b = 3)
summing <- function(a, b) {
    return(a + b)
}

summing(a = 2, b = 3)
#> [1] 5
The example above is summing up two different numeric objects. Note that the name for this function was chosen as summing, instead of sum. This is because R already has a built-in function called sum and so we don’t want to overwrite it! We’ll go over more of writing functions in the Efficient Coding section.
Packages, data, and file paths
A major strength of R is in its ability for others to easily create packages that simplify doing complex tasks (e.g. running mixed effects models with the lme4 package or creating figures with the ggplot2 package) and for anyone to easily install and use that package. So make use of packages!
You load a package by writing:
library(tidyverse)
Working with multiple R scripts and files, it quickly gets tedious to always write out each library function at the top of each script. A better way of managing this is to create a new file, keep all package loading code in that file, and sourcing that file in each R script. So:
usethis::use_r("package-loading")
In the package-loading.R file:
library(tidyverse)
In any other .R file:
source(here::here("R/package-loading.R"))
There’s a new thing here! The here package uses a function called here()
that makes it easier to manage file paths. What is a file path and why is this
necessary? A file path is the list of folders a file is found in. For instance,
your CV may be found in /Users/Documents/personal_things/CV.docx. The problem
with file paths in R is that when you run a script interactively (e.g. what we
do in class and normally), the file path is located at the Project level (where
the .Rproj file is found). You can see the file path by looking at the top of
the “Console”. But! When you source() an R script, it may likely run in the
folder it is saved in, e.g. in the R/ folder. So your file path
R/packages-loading.R won’t work because there isn’t a folder called R in the
R/ folder. Often people use the function setwd(), but this is never a good
idea since using it makes your script runnable only on your computer… which
makes it no longer reproducible. We use the here() function to tell R to go
to the project root (where the .Rproj file is found) and then use that file
path. This simple function can make your work more reproducible and easier for
you to use later on.
We also use the here() function when we import a dataset. Let’s save a dataset
as a csv file. In the project-session.R file, add this to the top of the file:
source(here::here("R/package-loading.R"))
Then, let’s add these lines to the end of the file:
write_csv(iris, here::here("data/iris.csv"))
imported_iris <- read_csv(here::here("data/iris.csv"))
head(imported_iris)
Encountering problems
You will encounter problems and issues and errors when working with R… and you will encounter then all the time. This is a fact of life. How you deal with the warnings and errors is the important part. Here are some steps:
- First, don’t get stressed (or try not to), this happens to everyone, no matter their skill level.
- Take a breath and go over the code again, checking for mistakes.
- Check that you haven’t forgotten a comma or bracket somewhere.
- Break code up into sections and run each section individually to see what is causing problems.
- Restart the R session (
"Session -> Restart R"orCtrl-Shift-F10). - Run the code again from the top of the file to the place where the error occurred.
- (Rarely need to do) Close and re-open RStudio.
Search for help (every session in this course has a “Resources” section, try
there first) by using the ? help function, using Google3, checking
StackOverflow, checking the
RStudio cheatsheets, checking package documentation, tutorials, or from online
books (like R for Data Science).
Resources for learning and help
For learning:
- Good enough practicies in scientific computing article
- Best practices in scientific computing article
- Organizing R Source Code
- An example of a well organised folder project
For help:
Acknowledgements
Parts of this lesson were modified from a session taught at the Aarhus University Open Coders, with contributions from Maria Izabel Cavassim Alves (@izabelcavassim), PhD student at AU in Bioinformatics.
- Functions are units of action in R. Everything that does something is a function. You can also create your own. We’ll cover that in later sessions. ^
- Directory also means folder. ^
- No joke, most of the skill in programming comes from learning how to ask Google the right way for your problem. ^